
General tips and Info[]
- | More advanced information is depicted on the following tabs.
The Factory requires a lot of concentration and control. Its Drones are rather slow, but they are extremely durable. Because of this, the most effective way to use this tank may be as follows:
- Players should keep their Drones to themselves at all times.
- When they’re not attacking anyone: Moving with the Drones in a star formation and keeping 2 drones in front of their tank will protect players from incoming projectiles of almost all classes.
- Making the drones face backwards and thus, hiding their Bullets (and therefore their location) from people in front of them. (Which can be useful for ambushes).
- And keeping non Tri-Angle branch glass tanks from boosting in their direction and chasing it.
- Depending on the build and internet speed, delay upon the update of the cursor’s position may cause the stuttering of the drones — pressing the W/A/S/D keys perpendicular to the direction in which the tank is going (once every 1-2 seconds) may be necessary; so as to not let any drones bounce out of formation whilst moving.
- When they are in battle: Players should move with their Drones while clicking ahead of them. (So as to keep the drones outside of the blue orbit).
- The resulting bullet stream will enhance their drone shield — by weakening projectiles before they hit the drones.
- And eventually form a bullet wall (similar to those of Bullet Rammers), capable of enhancing their momentum by around 50%.
- It should be noted that the bullet stream makes up for almost 51% of the class’ total DPS and that thus, it should not be disregarded in combat.
- Due to its short range, high DPS and complex controls (orbits), the Factory benefits from close range fights the most, as it can use its similar Drone-to-Body speed to simultaneously protect itself and attack at the same time regardless of its slow projectiles.
- The strategy against this tanks should consist mainly of moving with the drones and clicking ahead of the tank.
(Again, so as to keep the drones outside of the blue orbit). Predicting if the enemy will try to move sideways and correcting the drones aim appropriately.
- Why does it work?
- Bullets are faster than tanks, if one aims the drones at the place at which the enemy is going to be, there will be a much higher chance of the bullets actually making contact.
Spammers[]
- All the focused spammers can outpace the drone’s spawn rate.
- Notes
- Because of this, another layer of protection is needed when fighting these tanks. The Drone’s Bullets can make a pretty good job protecting the Factory’s drones. The Bullet DPS acting like a 2nd Drone-Spawner.
- However, the Bullet DPS is directly dependent on the number of drones available. And neither the Bullets nor the Drones can outdps a spammer on their own. Which means, the Drones will still be taking damage over time.
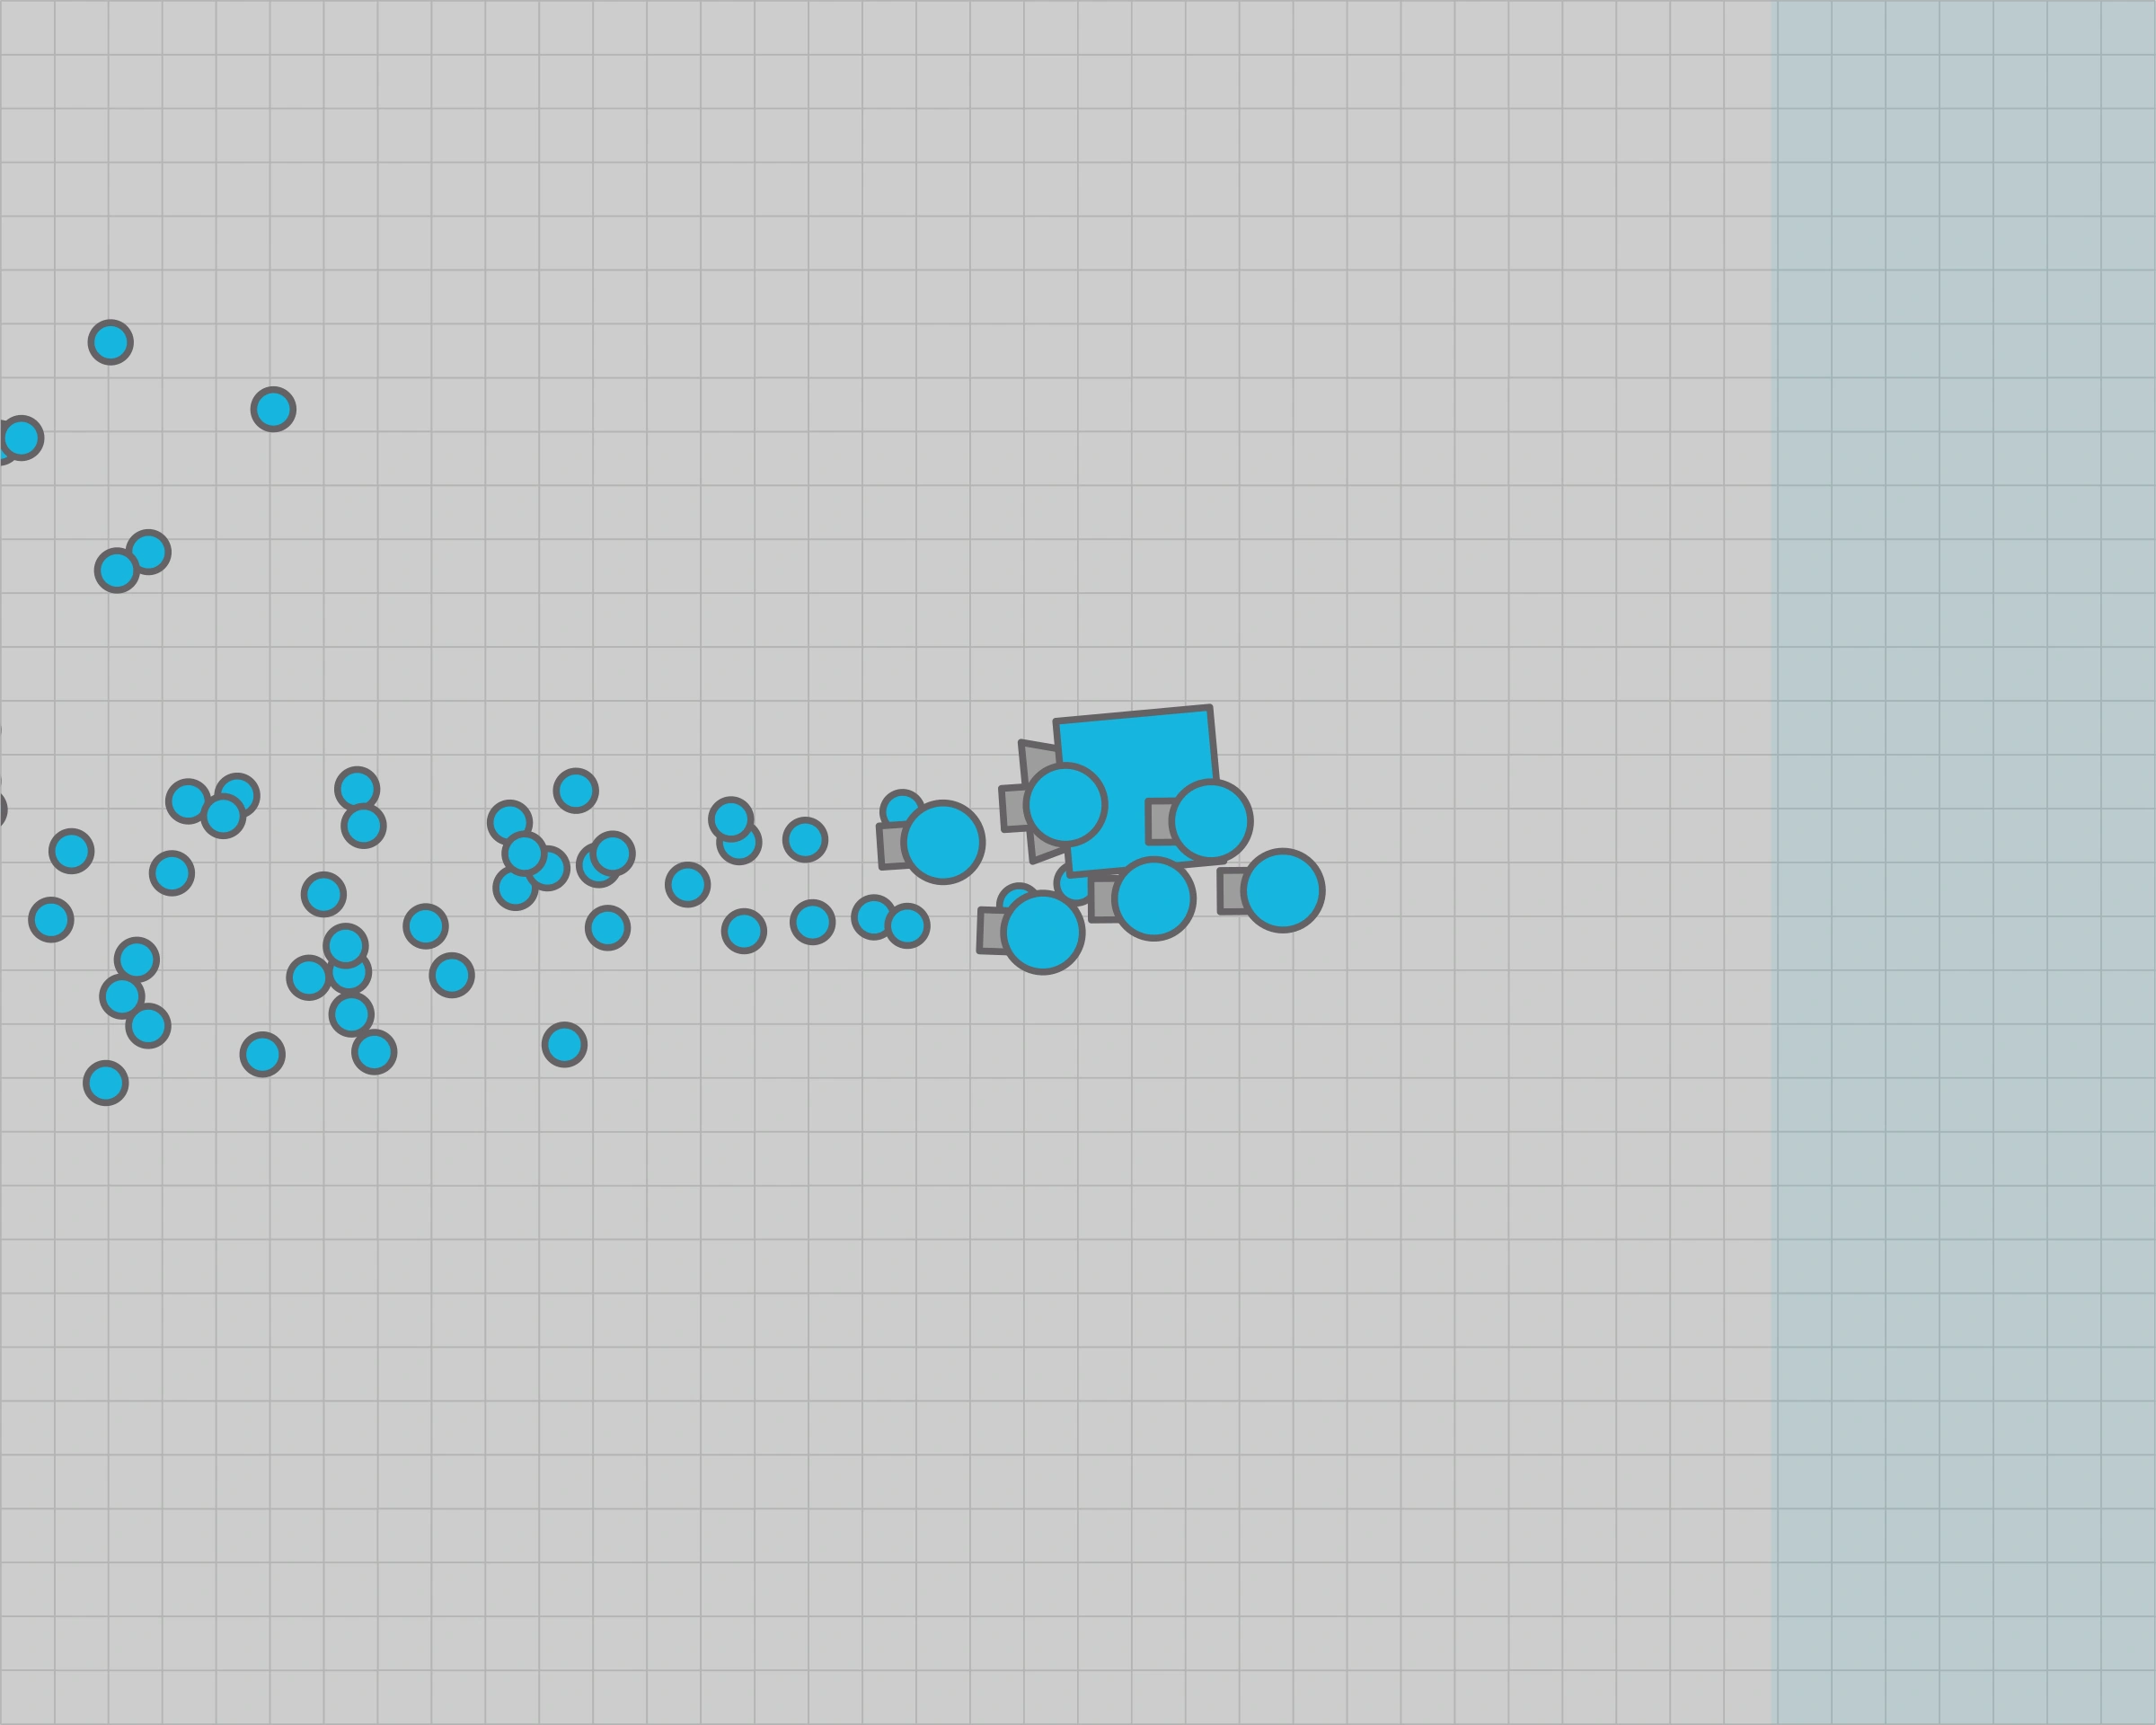
- To keep the number of withered drones to a minimum, a [ ]::: (2x3) formation (see pic), can limit the number of withered drones to 2 (Which are much simpler to replace than the usual 3 or 4 Drones of other formations).
- Most Focused-Spammers have some amount of recoil in the opposite direction they shoot. Because of this, they most likely will be able to escape the factory given enough time has passed. Attacks should be paired with an ambush for best results.
- The stream of classes like Streamliner and 00057777 AG can part your formation in 2 (It will push the drones away because they are only trying to move forwards) if it runs parallel to them. Creating a Bullet Wall beforehand will delay that effect.
- Additionally, moving about 6 background squares behind the drones and hovering the mouse slightly from side to side around the enemy will make the drones try to move slightly to the sides and stop the effect altogether.
Snipers[]
- All the Sniper’s Projectiles (including Stacked Predator’s) can be tanked via normal Far-Attract (1 to 2 rounds and between 0,32 and 0,4 secs per round).
- Notes
- Bullets go a long way — most of the time, the Sniper projectiles soaring through your FoV come from users firing in your bullet’s direction. Rather than having your tank directly on their screens. (Say, targeting you specifically).
- Against long range snipers – even though one can’t really ambush these classes, moving in their general direction with a close-repel formation, will generally make you appear less threatening. Meaning that you probably won’t really catch their attention until they’re in your FoV (which will delay their flight).
- Once/If they start to continuously shoot at you or you get close enough to them; Far-Attracting your drones in the bullets direction will always let you overwhelm the sniper’s projectiles. Unless another tank intervenes.
Trappers[]
- Trappers can accumulate more traps than you can destroy with just your drones.
- Notes
- Charging at them for up to 3 seconds before Drone-to-Trap collision starts will increase your momentum by about 50%. Maximizing the number of traps you can destroy — for a maximum of about 14,22 Traps before you start to create more drones.
- (Note that- depending on how worn down your drones are/How much damage they have taken already- the numbers will vary significantly).
- Alternatively, staying put and maintaining an ever-spawning line of drones shooting at the bunker, will let you destroy traps faster than they can be respawned. (As long as you have 4 or more drones in collision course with them at any given time).
- To achieve this, players should maintain a trajectory diagonal to their FoV. (Alternating between far-repel and far-attract makes controlling the drones easier).
- Once you manage to drive the enemy away from its bunker, you should be able to hunt them down head on (without charging first).
Destroyers[]
Due to the Destroyer branches’ recoil — this is the one case in which the spreading and Far-Repelling of the Factory’s drones is more effective than fighting in close-range.
- Why does it work?
- Similar than with other Overseer branches, it lures Destroyers into getting close and try to outmaneuver them to kill. But lets you attack the tank from multiple angles at once if it falls for it. Making it so that it can’t just destroy the drones on one front and retreat in the other.
- Moving your cursor from side to side whilst right-clicking (whilst maintaining the drones outside of the orange orbit), Making the drones enter the orange spiral for a few secs. Or alternating between Far-Repel and Far-attract — will maximize the spread of the bullets and focus the fire on the enemy when possible. To force the tank’s retreat or kill.
- Notes
- Faking location, in addition to the player’s enhanced FoV- can prove quite useful when avoiding ambushes and cornering.
- Do not use Close-Repel for blocking. (As it cuts your DPS in half).
- If ambushed, swing your drones in the bullet’s direction instead (2 Drones and 3 bullets are enough to negate one destroyer class projectile).
- If the destroyer doesn’t have maxed out bullet stats. (If its reload is lower or its bullets weaker). Simply charging at it will often force their retreat or result in them being cornered.
- And even if it’s not, you should still be able to tank 2-3 bullets head-on, before you have to start watching your drones. Shooting three times before each Destroyer class projectile spawns will let you outdps the tank consistently. (You’ll lose between 0 and 1 Drones per shot).
- But the Destroyer will have an easier time escaping.
- It is best adviced to do this when the tank recoils overly close to you or stays for a second shot. As you’ll be able to damage the tank severely before it has the time to shoot again.
Skimmer and Rocketeer[]
Unlike with the other Destroyer branches, the Skimmer and Rocketeer don’t have exorbitant amounts of recoil to escape most situations. However, their larger FoV can make them that much harder to pin down. Due to their reduced DPS — just charging at them point blank should prove enough to overwhelm them.
- Why does it work?
- While their bullets are pretty durable, the momentum of multiple Factory drones is larger.
- Their DPS, (75% and 125%) barely compares to that of a Focused Spammer.
- That being said, so long as the Factory drones shoot one round before the bullets collide (twice for the Rocketeer). The Factory will not lose drones faster than it can re-spawn them.
- Notes
- Beware that if the Rocketeer’s missiles hit you at the sides of the drone shield it could still kill you. (Given you don’t manage to move out its trajectory in time).
- Moving behind the first line of drones (not further back), and correcting your drones’ aim should do the trick.
- Like with Spammers, users of these classes will be able to use their recoil to eventually escape you, given enough time has passed.
- Because of this, ambushes may be needed when aiming for them.
Overseers[]
- The Battleship and Necromancer are exempted from these strategies.
“Overseers — how many times have your runs ended like this?” The most efficient way of dealing with the Overseer branch may be to simply blast one’s way to the tanks — easier said than done, the Overseer branch still makes for the Factory’s most difficult matchups. A number of the skills necessary to fight as and other classes are also necessary to properly fight these tanks.
- Notes
- The Factory’s biggest strength is its high DPS, which ensures it can regenerate its defense faster that it can be destroyed. And makes the tank effective in spite of its slower drones.
- Its Drones can take twice as much damage before they de-spawn. And the re-spawning rate is relatively high. This can put the Factory’s drone-spawner DPS between equal, twice and 4 times as strong as that of its enemies (Depending on both their class and the tanks’ Builds). But it only has 6 of them.
- This translates into a bigger momentum packed in a smaller amount of space. Which is good when you are trying to regenerate your defense (momentum) and outlast the enemy. But makes the tank more vulnerable when a smaller amount of drones is lost.
- That is to say, the Factory can use its defense to absorb the enemy’s offense, and still have enough to counterattack or deal a final blow. But its drones do still accumulate damage over time — and many of them dying at the same time can create a hole big enough it can be fatal if triggered at the wrong time. The chances of this happening are low, but (along with its repercussions) seems to increase the higher the reload of the tank being faced is.
- To reduce the effect on both fronts — complementary skills, normally associated with other tanks can be implemented, so as to ensure damage to the drones is dealt in a more manageable way:
- Players must exploit the Factory’s bullet stream to weaken enemy drones before they can get close, (Especially important against higher reload enemies), Hitting them specifically with 1 rounds per drone, or 6 drone bullets. (1,5 rounds is enough to destroy 1 enemy drone). This acts both as a preventive measure and fail-safe — for when the enemy drones outlast yours, and the distance between them and you isn’t big enough for you to spawn another one in time.
- (Say 2 - 4 = -2 where the negative result is the damage taken, is better than the 2 - 9.8 = -7.8 HP that would be taken if the drones weren’t weakened before collision).
- Factory users could benefit from playing low Bullet-Speed Fighter against Overlord — And making use of the tap-fire strategy extensively (to destroy enemy drones before they can get too close). As it being the Fighter’s main way of survival when facing this tank will improve their bullet-aim during these kinds of situations.
- Factory vs Overlord is more of a “get your drones to their drones by whatever means possible” in the sense that the movements necessary to block the enemy drones (especially with just your drones) depend mainly, on their position in relation to your own drones and the direction in which your tank is moving.
- That is to say, while one can survive most incoming attacks solely with spin-y like movements and ramming the drones into the enemy drones whenever they get close — they should not relay on it. For it’ll be more difficult to keep the pressure/stay offensive when facing higher reload tanks.
- Therefore, once the movements become instinctual– players using the factory should focus on sharpening their moves and bettering their bullet-aim whilst defending. In order to out-dps the enemy as efficiently as possible. (Which again, will make about all the difference against higher reload tanks).
- While high reload overlords can overwhelm your defense by forcing you to stay defensive until the shield fails– performing this strategy correctly will exacerbate the DPS difference between you two. Giving you the same opening you find against lower reload builds.
- And maybe even making it easier to take down these tanks than other ones. As players using the glass build tend to stay closer to you in order to make use of the drones they spawn more aggressively.
- That is to say, against Glass, once the enemy is left without most of its drones (and it will be if you do your moves correctly), departing from your own and Far-Repelling them towards the Overlord with a certain spread. While you follow at a relatively close distance (like you do against Bullet Rammers) will completely shut down the tank. For its lack of health points will make it impossible for them to repel at you without being hit damaged by your bullets. And the increased distance between you two impossible for them to kill you before you kill them if their shield is disengaged.
Necromancer[]
- The information above does also apply to this class.
Where Glass Overlords are great at keeping the pressure, the Necromancer’s extreme momentum lets it almost fold the strength of the Factory’s drone shield with its own (1,8 times as durable). Because of this, players targeting the class should maximize the amount of damage inflicted through their bullets before drone-to-drone collision starts (the less drones available the weaker your bullet stream will be). Where other Over classes should be tried to dealt with quickly. Maximizing the time this match-up lasts is essential so as to give your combined DPS a chance to catch-up.
- Notes
- One will most likely run out of drones while fighting this class. To ensure survival, another layer of protection is needed — directing where the newly-spawned-drones are released is essential to ensure that the player won’t be killed by the remaining Necromancer drones before more drones can respawn.
- Practicing with the Destroyer. More specifically spinning in-between shots whilst in auto-fire. And trying to direct where the bullets are released in order to kill enemy players should enhance the player’s feel/grip on this technique.
- Charging at the necromancer as soon as it enters the player’s FoV is important to maximize the time you have to amass a bullet-wall before you start to lose drones.
- If you are not sure about your drones’ strength or you didn’t have as much time to charge — repelling your drones in the Necromancer’s direction. While you follow closely after (like you do against Bullet Rammers) is a good way to avoid death given too many drones hit one side of your shield. Hence, the increased space between your drones and you will give you a somewhat bigger time to react.
- If they try to surround you from all sides, by repelling their drones and then closing the formation on you — focusing on one side of the cloud whilst moving around — should let you create a hole big enough, that the slightly larger time it takes the other drones to move to you from the other side will be enough for you to re-spawn more drones.
- It should take anywhere between 0,9 secs and 4 secs to overwhelm a full reload necromancer with this strategy.
- The Factory has 7 drones to go through before it has to create more again. Meaning it can take up to 23,3 Necromancer drones with just its drones. And then up to 10,2 more with its Bullet Cloud.
- It should be noted however, that depending on the amount of damage either party has taken beforehand — that this numbers will vary significantly.
- Chances are — that the Necromancer, having its momentum spread around a much larger number of drones and being unable to automatically spawn more, will have more accumulated damage overall.
- Even without taking the Factory’s momentum into account. Its DPS alone should translate in the tank being able to destroy Necromancer drones at a rate of about 1,14 drones per round (6 bullets) every 0.32 secs. Or 3,33 drones per Factory drone (1 drone) every 0.96 secs depending on reload.
Battleship[]
There used to be a time when the Battleship class was considered a Factory counter. Those times did end. As players figured how to take advantage of the class’ more unstable controls. Battleships can be pretty dangerous, they spawn many drones that not only are fast — but that being so small and moving in different directions at once can prove pretty difficult to intersect. After all, there’s only so many places in which your 6 drones can be at once — right?. Maximizing the space you negate through your drones’ bullet stream whilst charging at the Battleship does make it a lot more difficult for their drones to slip through.
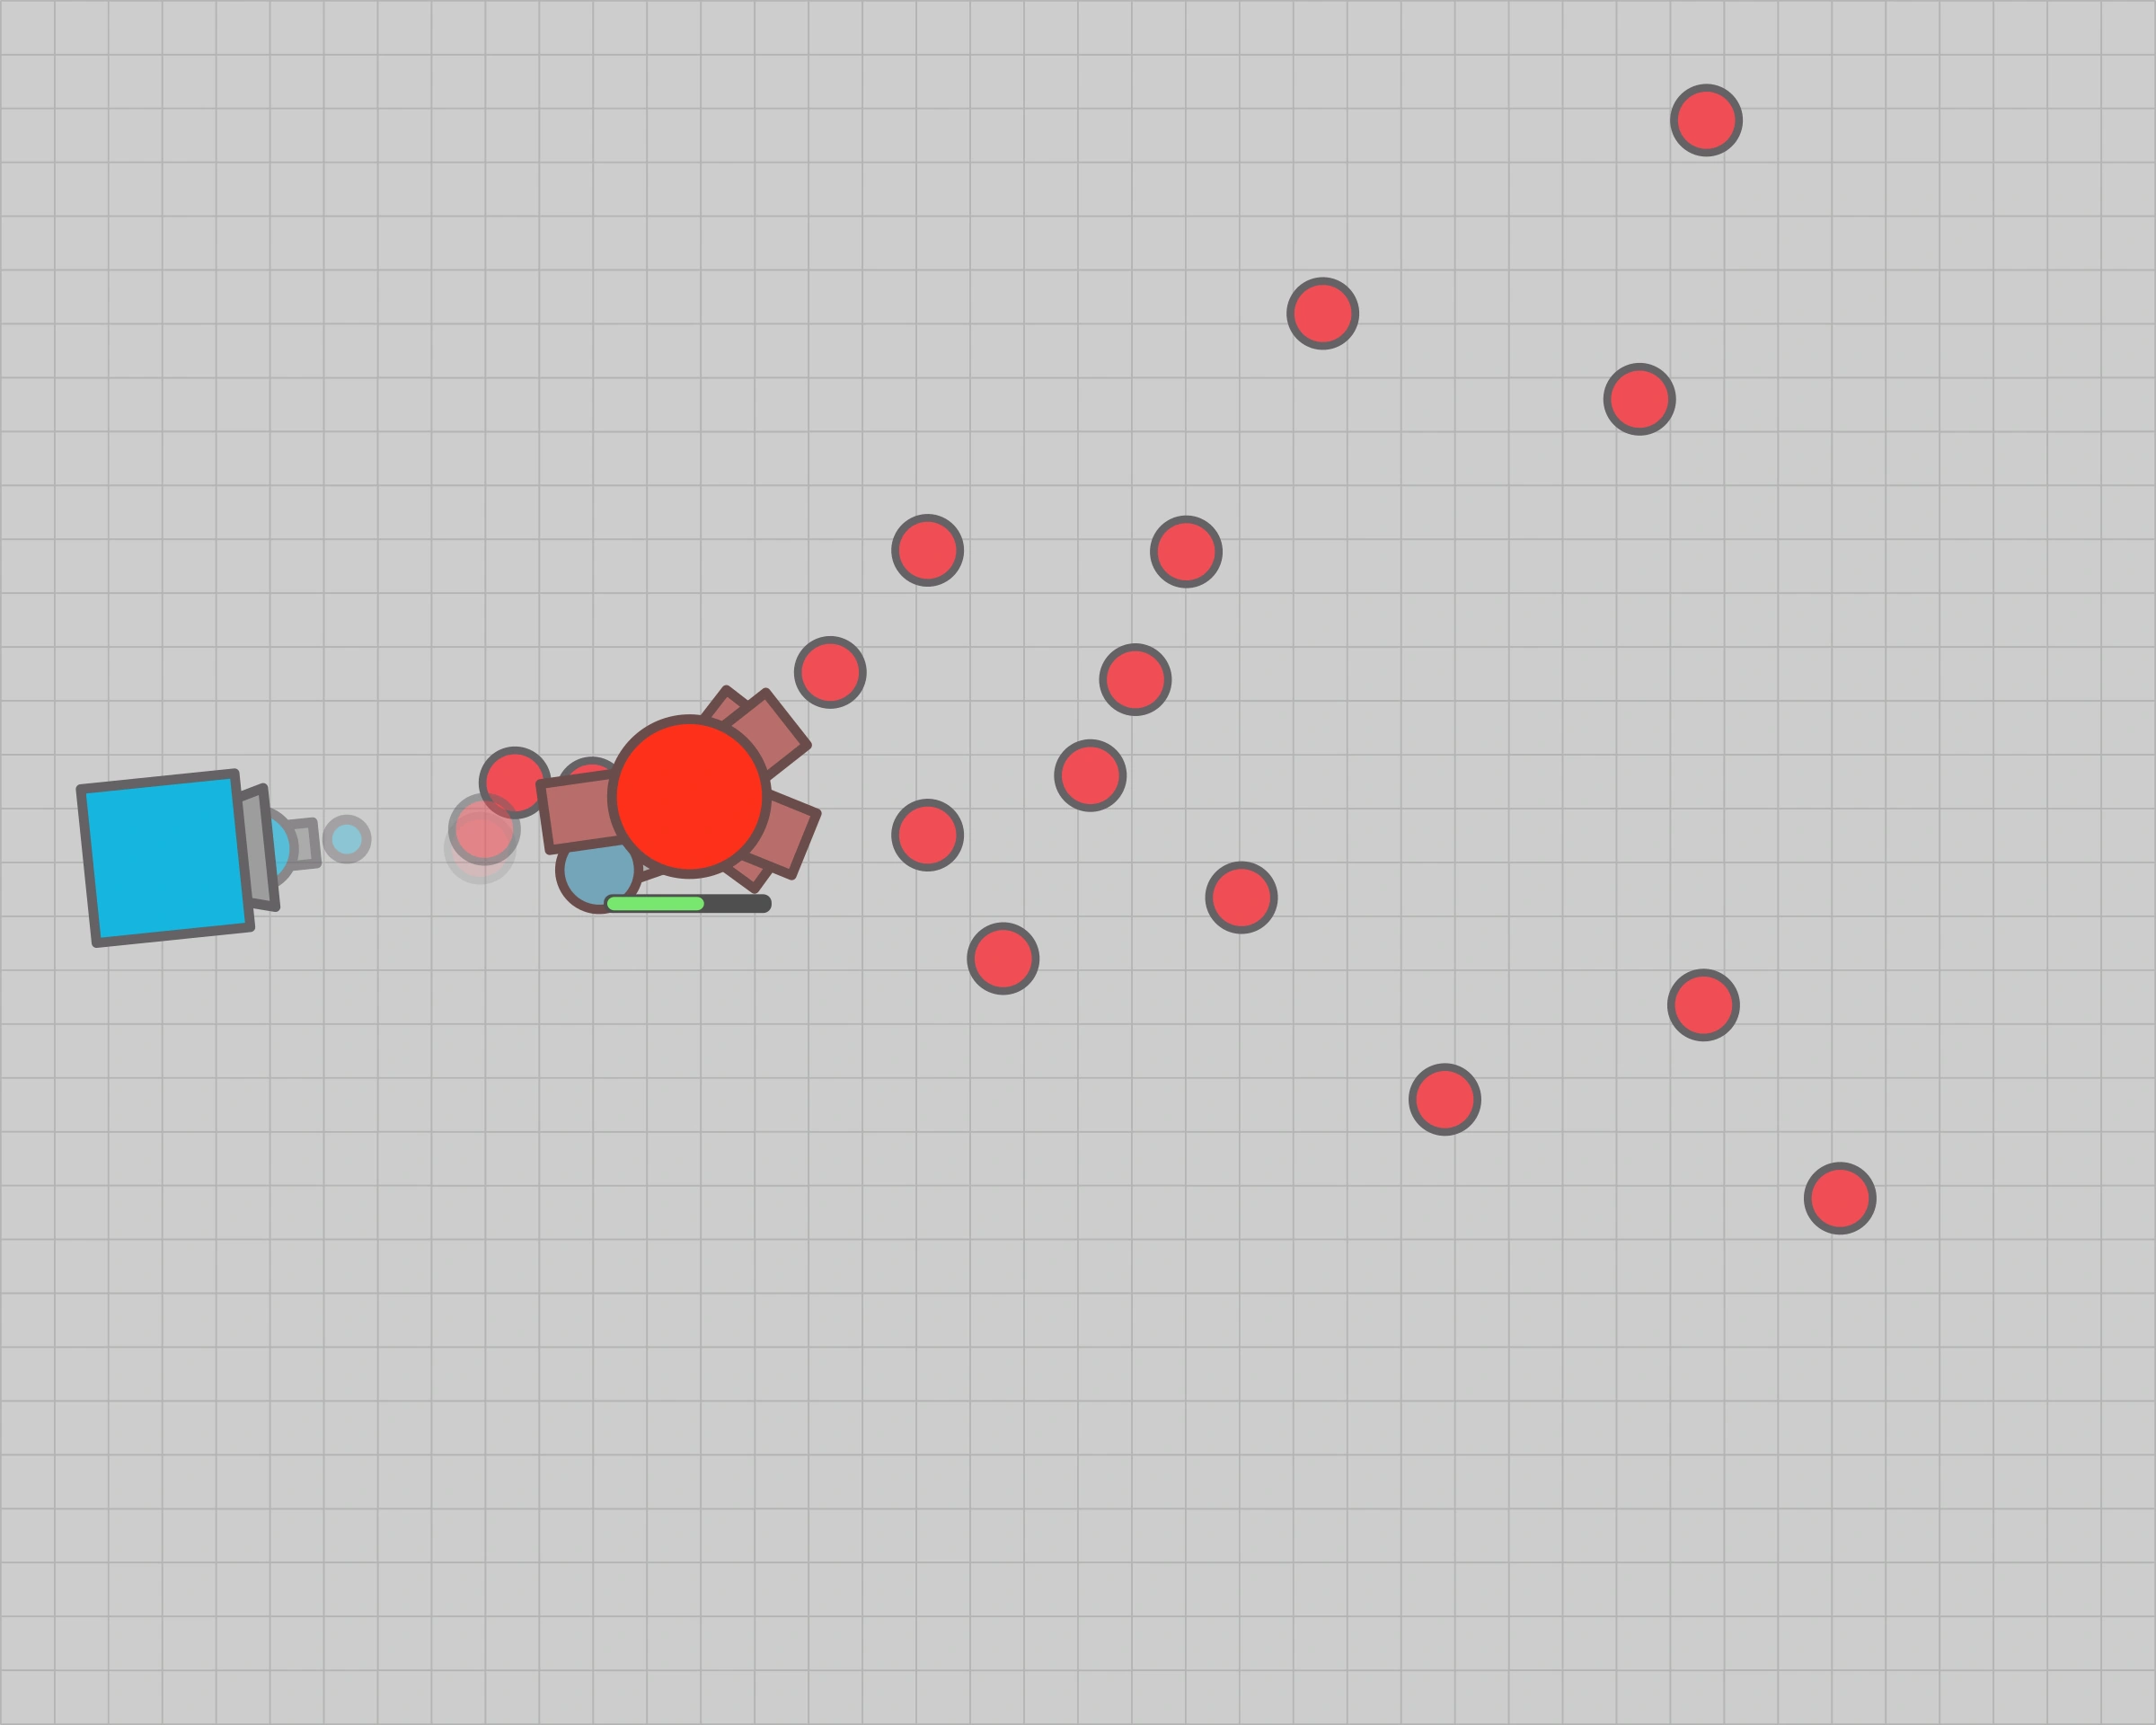
![For builds with equal drone-to-body speed like 77757. Which rely on covering the Factory’s Hit-Box completely to avoid getting damaged.]]](/wiki/File:Factory_STRATEGY_2.1.png "Factory STRATEGY 2.1.png (100 KB)")
Which rely on covering the Factory’s Hit-Box completely to avoid getting damaged.]]
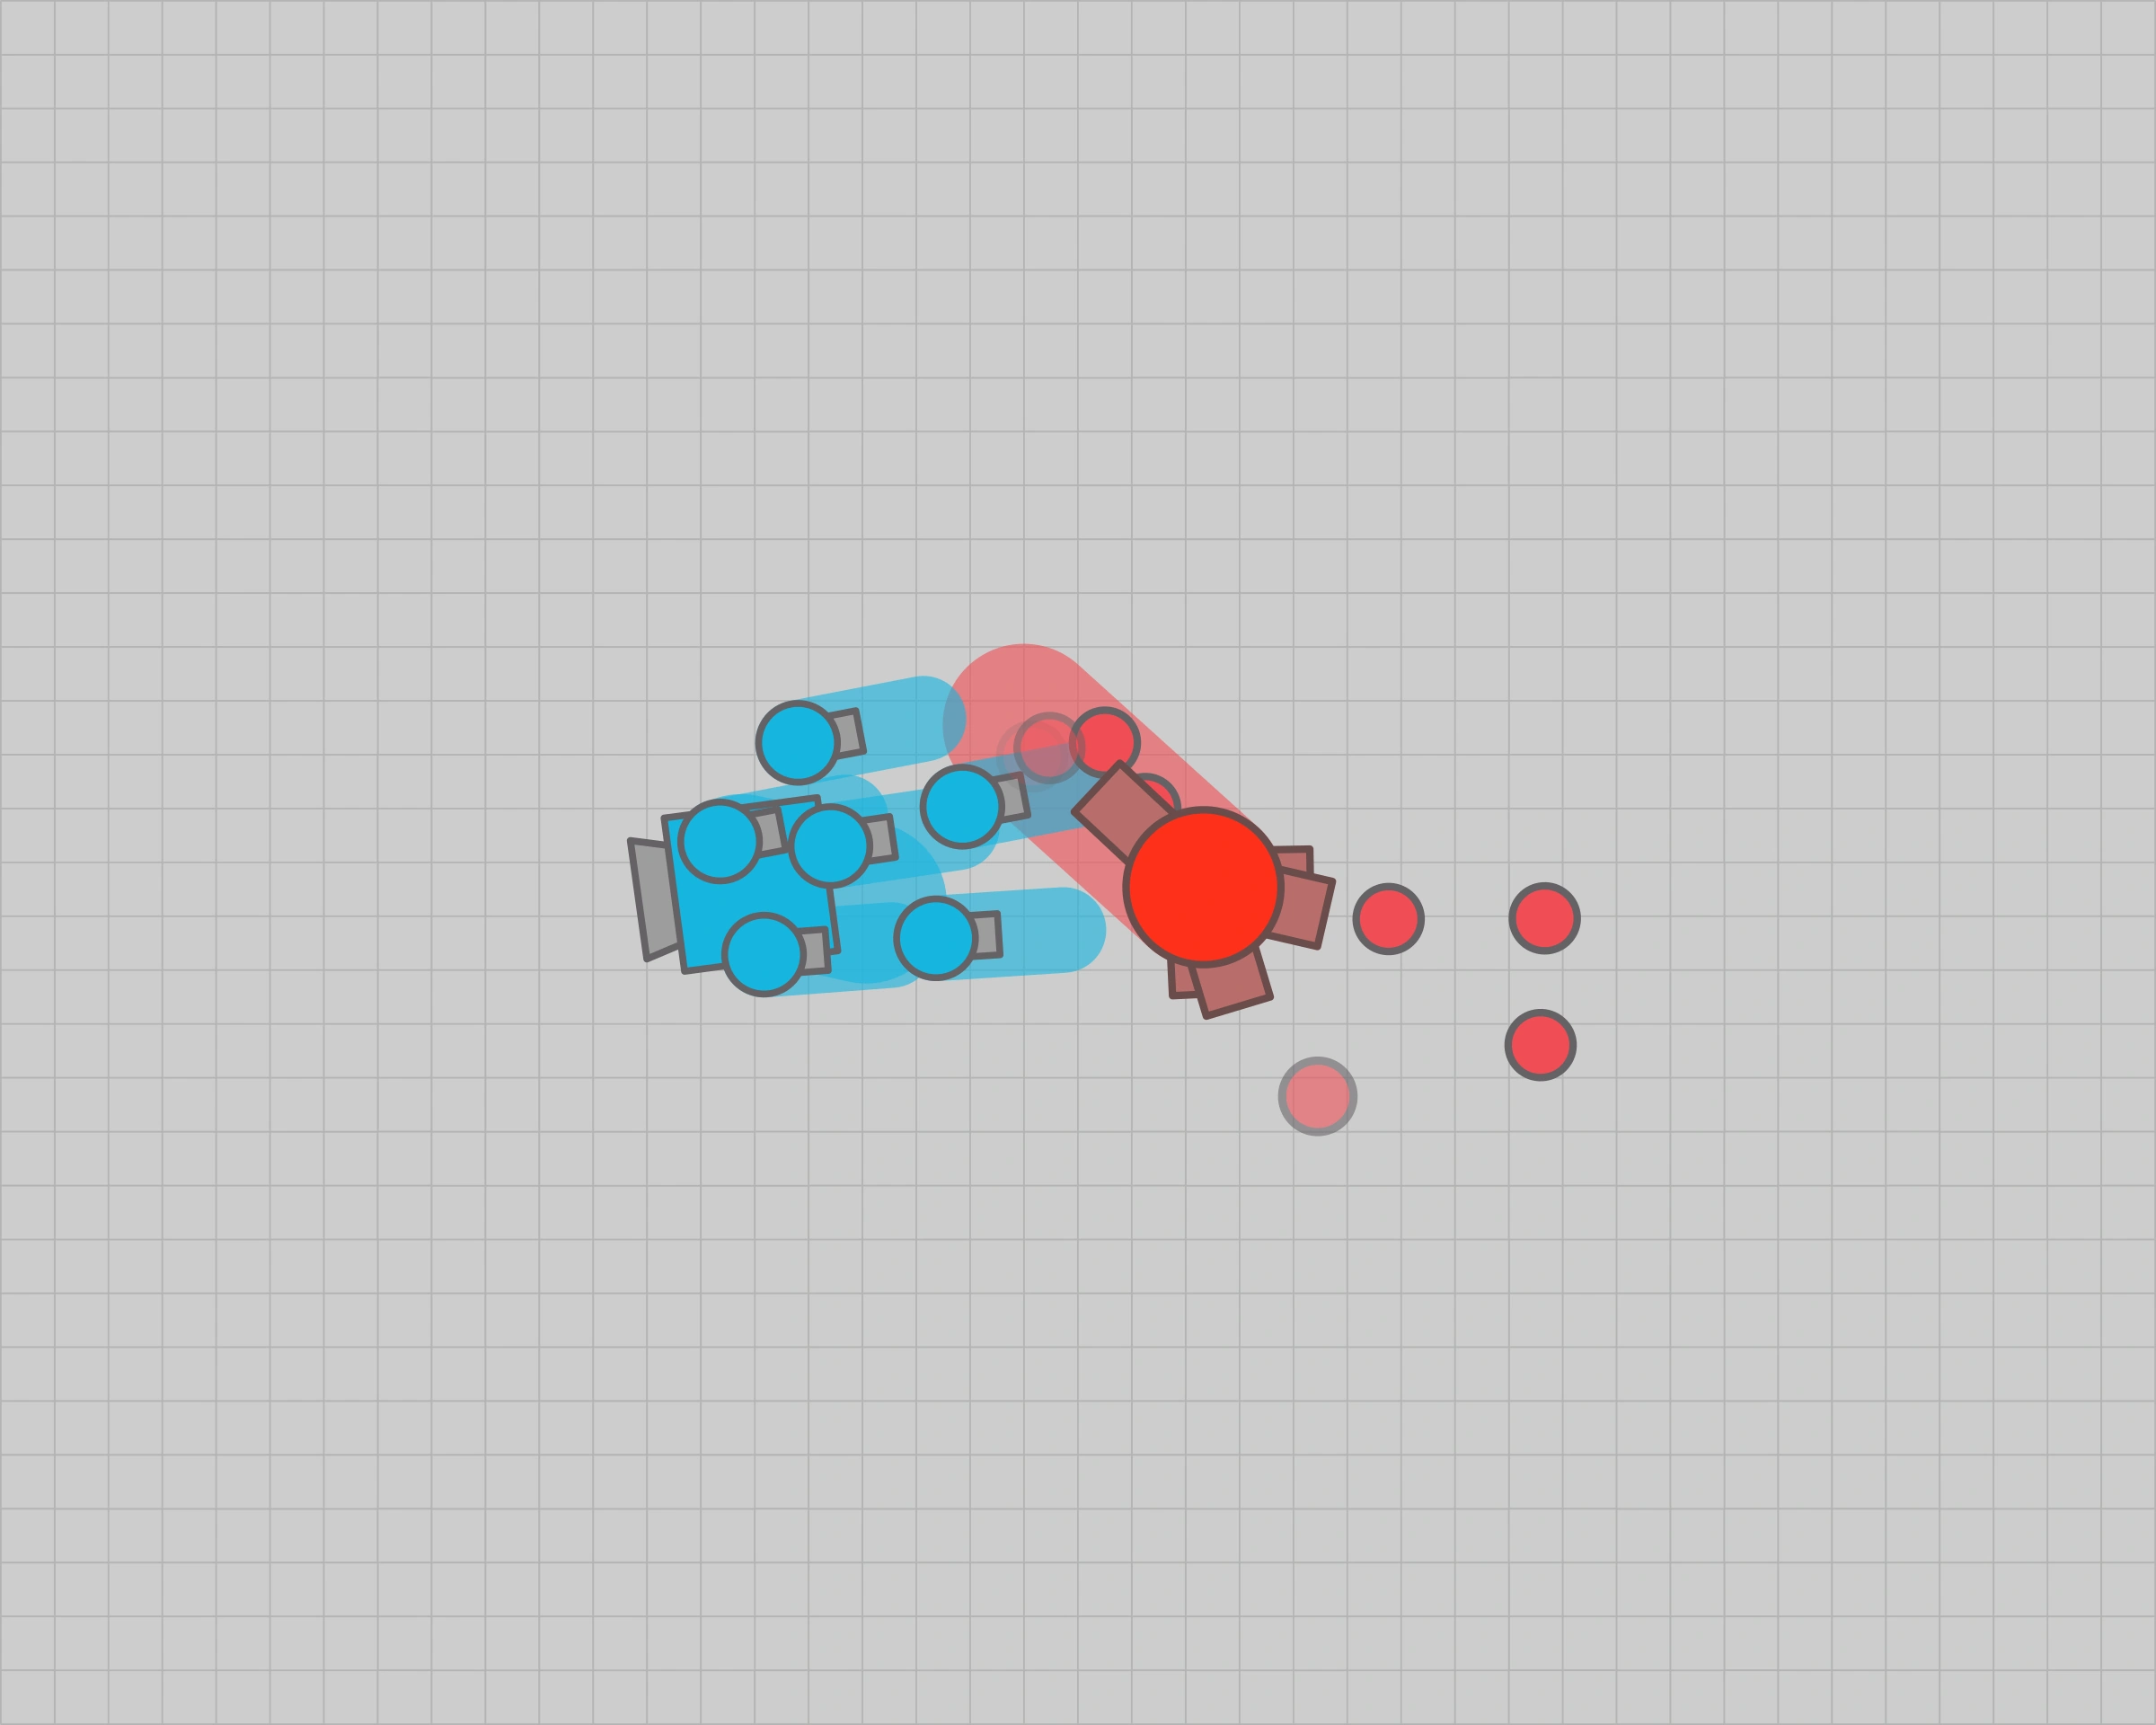
![And Builds with high r like 67776. Which covers the Hit Box partially and aims to destroy most drones with the sheer number of bullets instead.]]](/wiki/File:Factory_STRATEGY_2.6.png "Factory STRATEGY 2.6.png (184 KB)")
Which covers the Hit Box partially and aims to destroy most drones with the sheer number of bullets instead.]]
- Why does it work?
- Each of the Factory Drones has the same rate of fire as one of the Battleship’s spawners. Yet each of their Bullets is more durable.
- In consequence — shooting at the enemy drones point blank, before they can reach the tank becomes a viable way to avoid getting hit.
- (The larger the distance the enemy drones have to travel and the more bullets there is the more likely they are of being hit).
- Battleships also can’t really knockback the Factory drones out of formation. And have thus to rely on destroying them one by one (or watch for openings) instead.
- That is to say, given an ambush or if you the Factory is distracted — moving the drones around your body and/or toward the incoming drones with spinny like movements. Can prove reliable enough an emergency move to deny the initial attack. But not when you are moving towards it/trying to kill the tank.
- Notes
- You can un-sync the Factory’s drones by letting the AI target nearby shapes and retrieving them. This will make it even more difficult for enemy Drones to sneak perpendicular to their combined stream and hit you.
- Because of the inherent problems that charging with a close-repel formation has (Mentioned in General). The 2nd strategy does prove more reliable an easier to perform — whilst technically all builds can use it. It is the high reload ones that benefit the most from it.
- You should keep in mind, that the more drones you have at the sides, the more lines of bullets there will be. And the less likely you are of being hit.
- It should be noted that the drones automatically fall in 3x2 formation (as seen in the last pic) when moving forward. Moving the drones from side to side (like you do against the AG and Streamliner) may prove useful for different reasons.
Rammers[]
- It refers to tanks sporting high Body Damage builds, in exchange of un-upgraded bullet stats.
To anyone wanting to know how to kill rammers as Factory- the easiest way is to lure them- by ignoring them altogether. Letting them get close by attacking another user. Or Far-Repelling 3 or 4 of the drones (preferably) where they are going to get destroyed. Making them think they’ve got the advantage — but ramming drones into them at the last second.

- Why does it work?
- Rammers normally try to lure Overseers into overextending their drones — so they can get the kill before the drones can be retreated.
- A factory however always stays close to its drones. So they gotta try something else — to outmaneuver them or catch it in 1v2.
- Overall the factory always has the power advantage. (It takes 3 drones and 8 bullets to kill a maxed out rammer).
- But rammers are much simpler to control.
- To lure a rammer, is a simple way to give them what they are looking for while twisting it to your advantage. (More complex strategies require more control).
- And one drone (at max HP) is always ready for lunch.
- Notes
- If you are trying the first lure:
- As soon as, or before the drone-rammer collision starts, change the drones’ trajectory so it diagonally crosses that of the enemy tank. This will keep the Rammer from going in between your drones.
- Make sure there are at least two drones in front of you before you collide with them. And make sure to always face in their direction so that the newly spawned drone can finish them.
- Do not move in the same direction your drones do. (There is a chance the drones in front of you will have low HP). Try to move slightly to the side instead.
- Do not depart from any of your drones unless it is part of your lure. But don’t use close-repel either. (Again it cuts your DPS in half).
- Given a sandwich, players should always go in the rammer’s direction. They either move or they die.
Tri-Angle branch | Fast Melee tanks[]
- | It refers to tanks from the Tri-Angle branch, with 0 to low Bullet Speed, as well as their GLASS builds.
- | And low Bullet Speed builds of other classes.
Tanks from this branch can marginally outdps the Drones’ Bullet stream with theirs. They will be unable to destroy them fast enough to matter. But you’ll be unable to damage them too. Exceptions aside, most builds also won’t have a big enough momentum to afford speeding through more than one drones.
In consequence, a matchup between these classes becomes more of a “Who can sneak shots at whom?” and Factory’s extremely high burst damage but lack of AoC vs Tri-Angle branches’ superior forward Speed and maneuverability.
- Strategy
- Factory can get outmaneuvered because its drones — while powerful don’t occupy much space nor are particularly fast. The streams of bullets help, but they only go in one direction. And even then the range is quite limited. It’s like all the power is concentrated in a very small area.


- Since the drones are slower than the Rammer, the amount of space they can move or cover during a set amount of time will be lower.
- To avoid getting outmaneuvered — one should methodically spread the drones in front of the factory via Far-repel, for 1 or 2 seconds and calling them back again. So that if the rammer gets close you can pull drones from multiple directions via Far-attract.
- Far-Repeling, while moving slightly behind the drones lets you exchange focused power for Area-of-Control. Somewhat like with the Necromancer’s cloud. You spread the drones around more so that the area you negate is bigger. And call them back periodically to avoid too much spread.
- The drones will be spread slightly further, but you ensure that you can address more than one of the enemy’s possible paths at the time.
- It’s like “a shifting armor” you just concentrate the fire if the enemy decides to close in again. (It also works against RAMS).

- Notes
- Overall — the faster a bullet rammer is the smaller the number of bullets it can “stack” at any given time becomes. The lower its Burst damage becomes.
- The tanks mentioned in this section are relatively fragile in comparison to the factory drones. Since they can’t afford to speed through them they’ll usually keep their distance. Circle around the factory in search of an opening or tap-fire from a distance in hopes that a bullet makes contact.
- Make sure that there’s at least one drone between you and the enemy at any given time. Re-adjust your position accordingly, or make sure to face towards the enemy so that when a drone is destroyed you can just re-spawn it in front of you again.
Other classes[]
- Without the Tri-Angle branches’ forward recoil. Classes’ offensive capabilities are usually hindered by the lack of Bullet Speed.
- Nevertheless — they are still harder to take down because the amount of “stacked” projectiles can still destroy multiple drones.
- Moving around 6 to 10 Background Squares behind the drones will usually have players trying to boost between you and them.
- If this happens, you should target the player once it gets within the drones’ range from the sides. While you move backwards (Letting the AI do the targeting may be also a good option).
- If you know you won’t have the time to create a bullet cloud of your own. You should try to move slightly out of the enemy bullets’ trajectory. That will force the enemy to correct its aim. And since bullets do not change directions, you should be able to target them again starting on even ground.
The exception | Dragon X[]
The one build with enough body health to speed through multiple drones, high enough speed. And a bullet cloud that can push them away. It can’t outdps the factory. And will most likely die if it fails to kill. But its momentum is big enough to disrupt the drone formation on its initial attack. If it tries to go in between your drones — change the drones trajectory so that it diagonally crosses that of the enemy tank. And charging towards it should let the respawned drones finish it.
- Notes
- Like with the necromancer, this is one of the few matchups where you purposely want to take it slow.
- If you rush in its direction before it gets close to your drones, there’ll be a much higher chance of it outmaneuvering you. By circling the drones and attacking you from the side.
- While durable. Melee tanks using this build will have a much harder time escaping once they’ve gotten in range.
- As they can’t really speed through all your 6 drones without charging. You should avoid or partially avoid the initial attack (by going out of the Bullet-Wall’s trajectory) or tanking them with a bullet wall of your own. Slowing down afterwards and using the drones as a physical barrier whilst you chip the Tri-Angles Health instead.
- If the tank, through whatever means tanks a few drones and/or gets between them and you — directing where the newly-spawned-drones are released will still give you a chance killing it should it come down to it.